posted by 이코 2007. 7. 10. 03:50

사용자 삽입 이미지
 
사용자 삽입 이미지

사용자 삽입 이미지

사용자 삽입 이미지

작년 이맘때 자작했던 일명 '야매35'로 촬영한 영화 '마지막 하루'의 몇장면입니다.
펜탁스 수동렌즈를 이용했고, GG는 니콘 F3 D-type 스크린을 사용하였습니다. 위화면들은 28mm f2.8과 50mm f2렌즈를 이용하여 촬영한 화면입니다. 캠코더는 DVX100B를 사용했었죠.
사실 퀄리티가 좋다고는 말하기 힘듭니다. 그 이유는 상당히 많지만, 가장 주된 이유는 접사렌즈의 문제였습니다.

국내에서 Achromat렌즈를 구할수 있는 방법이 전무하여, 당시 호야 10+ CU렌즈를 사용했습니다. 물론 10배짜리 배율도 찾기도 쉽지는 않았었지만, 주변부의 흐려짐은 렌즈의 성능을 그대로 보여주었지요. (해외에서 구입할수 있는 10+ Achromat 렌즈는 200달러가 넘어가고, 호야 10+ CU렌즈는 3만원을 조금 넘지요.)
이미지의 퀄리티는 지금 보면 '안습'입니다. 그러나 당시에는 자작에 큰 의미를 두었고, 영화자체의 내용과 적당히 어울렸기때문에 그걸로 만족했습니다. 어쨌건, 위의 스틸컷들을 보고 있으면 Achromat렌즈가 얼마나 중요한 역할을 하는가를 알수 있습니다.
실제로 M2나 Brevis나 72mm Achromat렌즈를 포함시킨 HD패키지를 판매하고 있습니다. SD패키지와 다른것은 Achromat렌즈의 구경밖에 없지요. 양질의 렌즈도 주변부까지 완벽한 성능을 내지 못하는 것을 생각해보면 고개가 끄덕여지는 부분입니다.

사용자 삽입 이미지

이 사진을 보면, Achromat 렌즈가 일반적인 CU렌즈와 어떻게 다른가를 쉽게 알수 있지요.
사용자 삽입 이미지
Achromat 렌즈는 주변부의 왜곡이 전혀 없습니다.

사용자 삽입 이미지
일반적인 CU렌즈입니다... 속이 다 울렁거리는 군요.

국내에서 대구경(72mm이상)의 Achromat 렌즈를 구할 방법은... 저도 모릅니다. +5를 초과하는 Achromat 렌즈를 구할 방법도.... 모릅니다. 다만 한때 해외의 유저들이 센츄리옵틱스 55mm의 +7 Achromat 렌즈를 사용했던것을 돌이켜보면 최근엔 한번 테스트해볼만한 제품이 등장했더군요. 바로 FUJIYAMA DHG ACHROMAT 200(+5)입니다. 구입은 해놓았는데 아직 테스트를 해보지는 못했습니다.


ps. 필터구경 43mm이하의 소형 캠코더들은 Achromat 렌즈가 없어도 큰 상관이 없다는 이야기도 있습니다만, 아직 실험해보지는 못했습니다. ;;; (할일이 많군요.)
posted by 이코 2007. 7. 10. 03:31

사실 35mm 어뎁터는 대단히 새로운 제품은 아닙니다. 품질면에서 최고라고 부르기도 문제가 있습니다. 실판매되고 있는 제품들이 많이 있고, 상당히 고가의 제품들도 있지만 다들 완벽하다고 부를수 있을런지는 의문입니다.

필름작업에 경험이 많으신 분들은 선예도나 광량손실의 문제때문에 35mm 어뎁터를 상당히 꺼려하시는 분들도 많은게 사실입니다. 딱 잘라서 '그거 못쓴다'라고 말하는 경우도 있더군요.

국내의 몇몇 업체에서 mini35나 pro35를 대여하고 있다는 소식을 들은바가 있습니다만, 렌트비용이 현실적이지 못하기 때문에 그 사용빈도가 낮은걸로 압니다. mini35나 pro35나 기존의 35mm필름카메라에 장착하는 렌즈(PL마운트)를 함께 대여하고, 이것저것 따라오면 사실 16mm필름 작업의 비용에 비해 큰 매력이 없다는 거죠. 개인 사용자는 더더욱이나 이런 비용에 민감하게 되겠고.. 그렇다면 어떻게 할까.. 직접 만들어 버릴까? 하는 생각이 들더군요. 듣기로는 그 구조가 매우 단순하다고 하더군요. 그래서 서핑의 서핑을 거듭하다 자작을 결심하게 됩니다.


처음 본 튜토리얼에서본 35mm 어뎁터의 구조는 이러했습니다.
사용된 각 부품의 이름과 그 단가가 잘 적혀있죠.


많은 해외유저들이 선택하는 디자인이 바로 위쪽과 같은 디자인 입니다. 렌즈는 캐논FD, 경통은 PVC클린아웃(PVC파이프)를 사용합니다. GG(그라운드글라스-렌즈를 통해 들어온 상이 맺히는 부분)는 니콘F3의 D-타입 포커싱 스크린, 그리고 캠코더와 연결되는 부분에 10배 접사렌즈를 장착합니다. 가장 평범한 static design입니다. static은 GG의 상태를 말합니다. 말그대로 정적으로 고정된 것이죠.


해외의 경우 각종 파이프등을 온라인을 통해 구매하고, 동일회사의 제품을 정확히 제단하여 사용하니 그 성공률이 높은 편이었습니다. 그쪽에서 구할수 있는 부품들로 선택된것이었으니까요. 그러나 국내 사정은 좀 달랐습니다. 배관 구매를 위해 한여름에 청계천을 신나게 돌아다녔으나 완벽히 같은 부품을 찾기가 힘들었습니다. 원하는 부품을 말씀드려도 잘 모르겠다고 하시고, 집요하게 물으면 '어디에 쓸거냐?' 혹은 '별 희안한놈 다보겠다'는 반응이더군요.


그래서 경통부를 대체할수 있는 것이 있을까, 찾아보았습니다. 해외의 튜토리얼들을 뒤지다보니 경통을 빈 필터링들을 연결해서 만든 경우를 찾을수 있더군요. 거기에서 아이디어를 얻어  찾던중에 디카용 렌즈 어뎁터를 찾을수 있었습니다.

클릭하시면 창이 닫힙니다.

이런 녀석들이죠. 그런데 이런 녀석으로 만들어 보자니 문제가 있었습니다. 마운트를 장착하기가 어렵더군요.

그래서 또 찾다찾다가 최대한 저렴한 쪽으로 조사를 했습니다. 그러다 눈에 띈것이 렌즈 뒤캡이었습니다.

클릭하시면 창이 닫힙니다.

랜즈 보호를 위한 뒤캡이죠.

여기에 구멍을 뚫고, 이것을 위쪽의 디카용 렌즈 어뎁터에 장착했습니다.


그 다음에 문제가 된것은 GG였습니다.

외국의 튜토리얼을 살펴보면 니콘 F3용 D타입 포커싱스크린을 이용했다고 하더군요.

혹자는 UV필터를 직접 갈아서 만들었다고도 하고 말이죠. 처음엔 저도 UV필터를 갈아보려고 했습니다.

니콘 F3용 D타입 포커싱 스크린은 남대문을 신나게 뒤져도 찾기가 힘들었기 때문이죠.

UV필터나 일반 유리를 갈아서 GG를 만들기 위해서는 알루미늄 옥사이드 분말이 필요했습니다. 물에 섞어서 천으로 살살 문지르면 된다고 하더군요. 그런데 어디서 구입해야 할지 알수가 없어 또 청계천을 누비기 시작했습니다. 외국의 경우를 보면 1000-1500방 짜리를 사용한다는데, 청계천에서는 500방 이상의 알루미늄 옥사이드 분말을 구하기 힘들었습니다.

그래서 몇일동안 포기하고 지내다가, 운좋게 남대문 카메라샵에서 딱 하나남은 F3용 D타입 포커싱 스크린을 구할수 있었습니다.

그렇다면 어떻게 GG를 디카용 렌즈어뎁터를 고정할수 있을까를 고민했죠.

해외의 튜토리얼을 보면, 샌드위치라고 해서 스텝업링과 UV필터 사이에 포커싱스크린을 고정시키는 방법을 사용하더군요.

저는 UV필터 2장과 빈 필터링 하나를 이용하여 그 빈 필터링 사이에 포커싱스크린을 고정시켰습니다.


그런데, 여기서 또 문제가 발생했습니다. 저는 펜탁스 렌즈를 사용했는데, 펜탁스 렌즈의 경우 마운트와 GG의 거리가 45.7mm라고 나와있는데, 이 거리를 정확히 맞출수 없었던 것이죠. 일단 촬영은 급하고 해서 그냥 대충 조립부터 해보기로 했습니다.


이 많은 부품들을 구하는 동안에도 문제가 있었으니 적당한 접사렌즈를 구하기 힘들었던 것입니다.

접사렌즈는 캠코더와 GG간의 거리를 줄여주기 위해서 필수적이고 또한 영상의 퀄리티에 지대한 영향을 미치는데, 저렴하고 양호하다고 알려진 아시안(Asian) 10배 접사렌즈를 구입할수가 없었던 것이죠. 다른 대체품을 찾다가 HOYA의 10배 접사렌즈를 찾을수 있었습니다. 저같은 경우 GG와 캠코더 렌즈와의 거리가 짧은 관계로 두장을 겹쳐 사용하기로 하여 두장을 구입했죠.


경통을 디카용 렌즈어뎁터를 선택했고, 포커싱스크린이 고정된 부분도 필터링을 이용했으므로, 상호 장착에는 전혀 문제가 없었습니다.

필터장착과 동일한 방법으로 끼워넣기만 했죠.

그런데 문제가 발생했습니다.

GG와 렌즈 마운트와의 거리, 앞서 말씀드린 45.7mm의 거리를 정확히 맞춰주지 못하다보니 필카용 렌즈의 초점이 정상적으로 맞아들어가지 않았습니다. 무한대의 초점이 틀어지고, 초점을 맞출수는 있으나 렌즈에 표시된 거리계는 무용지물이 되었습니다. 그렇다보니 퍼스트가 렌즈 거리표시를 보며 포커스를 잡아주는데 문제가 생겼습니다.(해외의 자작어뎁터들에 캐논FD렌즈가 선호되는 것은 GG와 렌즈 마운트와의 거리가 42mm로 다소 측정하기 용이하기 때문인듯)

그리고 결정적으로 저가의 접사필터로 인해 주변부 흐림, 색수차가 발생하여 영상의 품질을 떨어뜨렸습니다. GG가 고정형이고, 만드는 과정에서 약간의 먼지가 들어가니 그 먼지가 그대로 촬영되기도 했었죠.

실제로 만들어 보면서 실망도 많이 했지만, 가능성은 있어 보이더군요.


먼저 GG의 경우, 초기의 해외 강좌에서 니콘 F3의 D타입 포커싱 스크린만이 가능하다고 알려져있었습니다. 하지만 현재는 다양한 방법이 모색되고 있죠. F3의 포커싱스크린은 국내든 해외든 구매하기가 상당히 힘들다고 알려져 있는데, 최근에는 캐논의 스크린으로 대체하거나 다른 재료들도 시도되고 있습니다. 캐논의 경우 EOS-5용 EE-S타입이 사용가능하다는데 개인적으로 확인은 하지 못하였습니다.

접사랜즈의 경우 일반적으로 사용되는 접사렌즈는 수차로 인해 사용하지 않는 추세입니다. 요즘은 고가의 Achromat 렌즈(100-200달러 내외)를 사용합니다. 국내에서는 어디서 구매가 가능한지 충분히 조사하지 못하였습니다만, 분명히 어디에선가는 찾을수 있지 않을까...하는 생각으로 좀더 찾아볼 생각입니다. 저렴한 Achromat 렌즈를 찾을수만 있다면 수차의 문제는 조금은 해결되지 않을까 합니다.

일반 접사렌즈와 Acromat 렌즈의 차이를 보여주는 영상이 어딘가 있었는데, 조만간 링크 시키도록 하겠습니다.


해외에서 많은 사람들이 35mm 렌즈 아뎁터를 자작하고 있습니다. 또한 제품으로 제작하여 판매하기도 하지요. 하지만 아직 그 가격이 고가이고(최소 50만원이상) 그 품질또한 대단히 훌륭하다고 보기 힘든 면이 있습니다. 많은 사람들이 모여 충분한 정보를 공유하고 다양한 방법을 모색한다면 적게는 몇만원으로도 충분이 자작할수 있으리라고 봅니다.

posted by 이코 2007. 7. 9. 03:56

35mm adapter는 디지탈 촬영장비의 심도문제를 극복하고 고안된 장비입니다. MINI35나 여타의 다양한 제품들이 출시되고 판매되고 있습니다. 이런 장비들을 이용하여 기존의 디지탈 장비에서는 상상도 못할 '심도'를 얻을 수 있고, 이것은 어떤면에서 많은 사람들이 말하는 '필름룩'에 근접할수 있는 하나의 방법이라고 할수 있겠습니다.

그러나 이런 장비엔 많은 제약점이 있습니다. 사람들은 그런 실용적인 면의 제약점들은 고려치 않고, 자작을 시도하거나 비싼 장비를 구매하는데 저는 그것에 대해서 미리 말씀드리고 싶습니다.
35mm adapter는 구조적으로 몇개의 렌즈와 그라운드 글라스를 통과하면서 광량이 손실될수 밖에 없는 구조입니다. 더구나 영상의 엣지가 살아있는 영상을 얻기위해서는 35mm adapter에 장착된 렌즈와 캠코더의 렌즈의 조리개를 적절히 조여주어야하는데, 실제적인 광량의 손실은 배가됩니다.
그런데 한번 생각해봅시다. 이른바 단편, 독립 혹은 인디영화라는 것은 예산의 한계가 뚜렷합니다. 이런 예산의 한계는 가장 먼저 조명기 양의 한계로 이어지곤 합니다.  그러나 조명기가 모자란다고 해서 밤에 찍어야할 분량을 낮에 찍을수는 없는 일이죠.
또 대부분의 제품들이 화면이 상하좌우 반전이 됩니다. 후반작업시 화면들을 뒤집어 주어야하고 이것은 렌더링을 필요로하는 작업이므로, 결국 그만큼의 시간을 필요로하게 됩니다.

얻는 만큼 잃는 것이 명백한 기기입니다. 그렇다면 왜 당신은 자작을 하는가라고 물으실지도 모르겠습니다. 이유는 참 간단합니다. 수십만원이면 기백만원대 퀄리티의 자작품을 만들수 있다는 것은 이미 해외의 수많은 유저들로 하여금 검증되었기 때문입니다. 이것을 거꾸로 말하면 몇백만원씩 주고 구입하는 것은 솔직히 낭비라는 것입니다.

올해초 네이버 카페를 통해 자작과 관련된 커뮤니티를 운영하기 시작했습니다. 제가 아는 것을 글로 올리면서, 많은 유저들이 함께 고민하면 훌륭한 자작기가 올라오리라 기대했었습니다. 그런데 자작기는 딱 하나뿐이었습니다. 어째서인지 많은 분들은 해외의 수십만원, 아니 몇백만원짜리 기기의 구입을 원하시더군요. 언젠가 부터 구입에 대한 문의글만 올라왔습니다. 그런데 구입에 대해 제가 알리가 없지요. 자작만 해봤을뿐 구입해보지 않았는데, 어쩌겠습니까. 번지수가 틀려도 단단히 틀린겁니다.

자작기가 어떤 식으로 다시 시작될지, 어떤 자작품이 나올지는 모르겠습니다만 미리 말씀드립니다. 이 곳은 '35mm adapter라는 제한적인 촬영용 악세사리를 자작하고자 하는 이의 블로그'일 뿐이라는 것입니다. 유명 35mm adapter의 구입에 대한 문의는 사양하고 싶습니다. 해당 업체의 홈페이지를 통해 직접문의하시기 바랍니다.

함께 만들고 싶은 분들은 언제나 환영합니다!
정보의 장이되길 바라며...

posted by 이코 2007. 7. 5. 04:03
posted by 이코 2007. 7. 5. 03:56

This is a years-old guide, and won't produce great results. But, due to popular demand, I've put it back online. I updated my own adapter to look something like this over a year ago:


Which works something like this, even using the cheap +10 Macro:
Click Here
I eventually just bought a beta Guerilla35, though, which has a much better macro, so it's what I'm currently using. Anyhow, this may not produce anything great, but it makes the concept of the adapter simple to understand, so it's a good starting point. You just won't get acceptably good results, chances are. I may upload a new guide which is simpler and produces much better results...but I probably won't. I'm busy--and there are plenty of other good ones.
-Matt

Note: This works well for me on my dvx100a. Due to the dvx100's lesser macro focusing ability, it might not work so hot on it. By shortening the length of the PVC tube between the projection screen (“ground glass”) and the macro lens (achromatic diopter) by using a dremel or saw, the design can probably be adapted to work better on both. No guarantees, though. Also, with the cheap macro lens, the camera has trouble focusing evenly, especially at lower apertures (the edges go out of focus). If you know where to get a better macro lens for a reasonable price, please send me an email at commode@gmail.com. Also, this design can definitely be adapted to fit other cameras really easily, but I'm too lazy to work out the details. Getting a better image is my current priority. Now on to the guide:

THE HD-35! (Home Depot 35mm Adapter)

When the dvx100 was first introduced, people were thrilled by its sharp images, lack of chromatic abberation, impressive wide angle zoom lens, low light sensitivity, and generally impressive image quality. However, adding a shallow depth of focus to its acclaimed 24p mode has still eluded those who wish they were shooting 35mm film. No longer! Now, you can have a 35mm DOF with a compact adapter well under 100 dollars. All it will cost you is sharpness, lack of chromatic abberation, a wide angle zoom lens, low light sensitivity, and image quality.

Anyhow, before beginning, it's important to have a basic idea of how the mini35and similar devices work. I didn't before I started making this thing, and it sured would have helped me if I knew what I was doing in the first place. Basically, the 35mm lens projects an image onto a focusing screen just as it would project it onto a piece of film except that the focusing screen is translucent so you can see the projected image on it from the other side. The video camera then zooms in on this image and records it. It's really incredibly simple.

Here's everything you need (except JB weld or tape, depending on whether you want to make the thing permanent or not.)


The +10 macro (mine is Asian brand and works but isn't very high quality) is about 20 shipped on ebay. The Nikon mount is about 35 shipped (also from ebay). Any Nikon mount will work, so rip one off a broken camera if you must. For a cheaper solution, just use a rear lens cap, which costs about five dollars. It's not nearly as secure and it's hard to mount on PVC pipe, unfortunately. The 52mm UV filters are about 10 each, but since 52mm is the most common size, they can be found much cheaper used or in bulk or something. Mine are used. I used a beeswax candle for wax for the focusing screen and it works well, but I lose nearly 4 stops of light with it. Micro-crystalline wax (available at craft/hobby/candle-making stores, or so I hear) is not only easier to work with, but you only lose about a stop with it. I'm hoping to experiment with it in the future. The large grit sand paper can be found at home depot, along with the PVC piping. The PVC part numbers are “Nibco 4808” “Nibco 4803-2” for the threaded parts and 4801 2'' for the non-threaded tube. It's important to get exactly those parts. Trust me, I fooled around trying to make others work (though there may be others that work even better which I haven't discovered.) If you don't use those parts exactly, don't come to me asking why you can't get the thing in focus or why the filters don't fit.


The first step is making your focusing screen. This is the most important step, by far the hardest, and also the one I can offer least help with. The method I recommend is similar to what Oscar Spier from dvinfo.net recommends here: http://doublecam.250free.com/wax/wax2.htm. What I do is to take an Altoids tin, clean it completely so that there's no dust in it, then put a small chunk of wax in it, maybe the size of a grape. Then I put this in the toaster oven (seriously) at about 170 degrees Fahrenheit until it melts. Then I pour maybe 1/8-1/4 or a teaspoon of wax onto the top of a clean (and I mean spotless—dust will give you major static grain and weird artifacts in the wax). Then I put the UV filter in at the same temperature, until the wax is totally melted, and take it out and move the wax around. Repeat this a couple times until the wax is in contact with the entire edge of the filter. Then put it back in the toaster, wait until it's melted and as even as possible, remove it, place it on a VERY flat surface, put a clean cup over it so no dust falls in and wait until the wax becomes solid. The idea is to get the thinnest layer possible that's somewhat uniform (it does NOT have to be even close to perfect to look good) and covers the whole filter. I used too much wax so I lose a lot of light. Using micro-crystalline wax should help with evenness and thinness. Spraying the surrounding area with a water spritzer before you start should make sure no dust gets kicked up. I know this sounds daunting, but it's not. Just make sure the glass is clean, the wax is clean, and the altoids tin is clean. You can keep melting and remelting until you're satisfied, too, and even major differences in thickness don't show up very noticeably once the adapter is put together. (And the wax can be replaced even after the adapter is complete.) I do not recommend putting another piece of glass above the wax. Instead, I recommend screwing another clean filter above this one. That way, if you get dust in your adapter (and you will), you can just remove it with an air duster, since the way won't be exposed. Because of this (and other things), make sure you have the text on the 52mm UV filter facing up when you coat it in glass.


The Tiffen has wax on it. The Hoya is clean. Now, dust can't get on the wax, and you can just clean the filters if dust gets on them. Plus, you can unscrew them to fix the wax if you're unhappy with how your footage looks. Neato!


Now, place the two filters atop the threaded end of the Nibco 4804. The threads of the UV filter should rest perfectly inside the Nibco. Now, screw on the Nibco 4803. Be careful not to move the filters or the pressure fit won't work quite right.


Now, you can try holding your 35mm lens up to the fat end (the 4804) as though you were mounting it on it. Then hold the lens up to a light or a window and look at the focusing screen. You should see something like what's below unless your wax is way too thick (you'll see nothing) or too thin (you'll see a hot spot as well):


That's the whole idea behind the mini-35. Makes $10,000 seem even more ridiculous than it already does. Now, do the same thing but hold the lens up with the mount (or lens cap cover if you're going that route) so that the distance between the lens and the focusing screen is what it really would be if you were actually using the thing. Focus the 35mm lens of your choice (at its widest aperture) at infinity and point the lens out the window and at a far away object. Does it focus on infinity or at a slightly closer object? If the answer is “slightly closer object” you'll need to sand down the fat, non-threaded end of the 4804 so that the distance between the lens and the focusing screen is less and try again. The distance should be about 40mm, but since the lens goes into the tube a little bit, 42mm or 1.7'' is a good guess. But don't use that as a guide, sand and experiment. You'll probably need to shave off only around 1-2mm. This will also make the surface more even but rougher and more textured, which is necessary for sanding. Then have fun playing around with rack focusing if you want to. It works!


Sand on the side that says “lens.”

Now that that's done, you can mount the lens where it says “lens” on the above picture of the 4804. I recommend sanding the opposite side of the Nikon/EOS adapter slightly so that it's rough, or scoring it a bit with an exact-o knife or razor then centering it and gluing it with JB Weld. JB Weld is amazing stuff. You'll probably just want to tape the lens into place with masking tape (use a lightweight lens, and make sure the Nikon/EOS adapter is attatched!) for your first try as I have done.


After letting it sit for six hours, assuming you used JB weld, turn it over and place JB weld inside the crevasses between the PVC and the mount. Make sure you let it sit after this; this is all that's holding the lens on. And be careful not to use too much JB weld.


Now you'll need to attach the macro lens to the opposite side. First, slip the 4801 over the 4803 as shown in the photo below:


Or, if you want a shorter adapter (and potentially less vignetting) cut off a small section of the 4801 with a dremel or hack saw, and place this over the edge of the 4803 as shown below. Make sure to keep the “smooth” edge, which you may want to sand a bit, facing down, with the rough edge (the one you cut) facing the 4803. Use JB weld to keep it secure, and make sure it's on evenly. Otherwise, you won't be able to focus. (Use the edge of a flat table to keep it even.)


What luck; this now slides right into the 72mm macro! Make sure the threads face down so you can actually screw the lens into your DVX of course.


Now give it the ol' JB weld. Be careful not to get JB weld on the lens, just between the threads and the PVC. (I used tape since my adapter is temporary.)

Now, you're basically done. You can put the focusing screen back in place, screw the two pieces (once they've dried) together, put a lens on, and you're ready to shoot.


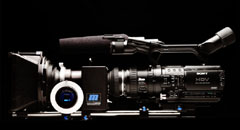
This is what your adapter should look like. About 4''. Not bad.


Of course, it's a little bigger with a lens.

And, just a reminder, here is how everything is stacked together:


Now tape that bad boy up if you haven't JB welded it (I would tape it the first time putting it together. Adjustments probably will have to be made.) Also, PVC pipe has a habit of letting light through, which is no good. It also reflects light in the barrel, which makes the footage soft and hazy. You may want to sand or bead blast the inside of the PVC a tiny bit, then spray paint it all matte black, inside and out (before constructing it, of course.) It will look cooler, and will let less ambient light through, which makes a huge difference.

Alternatively, just cover the whole thing with aluminum tape or something to block light. This really improves your contrast and makes footage look much nicer:


So there it is (held together with blue masking tape, covered in aluminum tape to keep out ambient light.) The 72mm threads hold it into the DVX very nicely. I'm going to use this thing with my glidecam later. That should be interesting (with my 28mm lens, of course.)


Now that it's on the camera, I use AF as a starting point, then adjust it manually. Between MF13 and MF14 at Z72 work well for me. Of course, if you can make the tube attached to the macro shorter (but not too short) you can zoom in less far, which means a more open aperture on the dvx100, and less light loss as well as a sharper image. (F2.4 is wide open here.)

With this design and these settings, footage is pretty sharp in the middle, considerably softer at the edges and with some chromatic abberation and next to no vignetting (despite the samples, which aren't zoomed in fully to Z72.) A better macro and a shorter distance between the wax and the macro lens would help.


Anyhow, enjoy. Come up with ideas (using a Nintendo 64 rumble pack for oscillating GG, anyone?), find cheaper parts, and send me links to them. With micro-crystalline wax, a slightly better macro lens, and some patience, you should be able to get great quality images with only a stop or two of light loss. My samples are pretty rough, but I made this thing in a couple hours expecting to refine it further later and it already works a little better.

출처 : http://home.comcast.net/~wauhkies/adapter/index.html

posted by 이코 2007. 7. 5. 03:51


Starting at the base, it connects to the DVX via a Cokin P series 72mm filter adapter. Mounted to that via set screws (refined from an earlier JB weld attempt) is a 2” male to female PVC adapter. Inside the wide end of the PVC (right before the Cokin) snugly sits a 58mm Macro +10.


Inside the threaded end of the PVC sits the heart of the unit, a Nikon F3 D screen, housed via silicone joints within two 49 mm Tiffen UV filters. This was done to prevent dust from getting to the screen (a big problem with DIY projects). Together the mount and the GG fit into a 2” PVC cleanout cap, which has had a hole cut out of the close end and an Canon FD mount screwed on (again JB weld was too cumbersome).


A Canon SCC 50mm f1.4 sits at the end with a 58mm Fotodiox lens hood to prevent flaring. The whole unit was then sandblasted, primered then coated with a semi gloss epoxy-enamel hammer finish. That was then lightly coated with matte clear coat. The surface is now very tough and resembles the metal finish found on many older Sony Betacams. The interior of the adapter was dusted with a flat black matte finish to reduce any light bounce.


I then created a helpfull workaround to the whole upside down issue by creating a removable mirror that shows the image rightside up. This does not solve the fact it is still backwards, but does help some when framing without a seperate LCD. (see LCD of first picture). Everthing can be found at ebay and home depot. Below is the link to the original design mine is based on, thanks whatever your name is: http://home.comcast.net/~wauhkies/adapter/index.html

I am very pleased with the results, as the Nikon screen works much better than my own ground glass (which had a funky 8mm look to it). I find for static adapters, if you cant handle the wax thing (which I could'nt) this screen has the least grain. With the lens I am using, no hotspots, however I did see a slight hot spot when using a 28mm f2.8. I have found acceptable sharpness considereing how much the image must pass through before it gets to the DVX. Below is some test footage I have shot with it.


출처 :http://dvxuser.com

posted by 이코 2007. 7. 5. 03:48
As great as the Panasonic DVX100 Camera is, XL1 users still can take a shot at it because you cant use "real" lenses on it. Until Now.

P+S Technik released the Mini35 for the XL1 awhile back, and it has created quite a reaction. The idea of using Cinema lenses on the DVX even brought a mad rush of DIYer's trying to make their own version of adapter for the DVX100. Well Finally, P+S Technik has released a version of the Mini35 adapter for the DVX100, and we where very excited when they arranged for us to check it out.

Clairmont (www.clairmont.com) graciously hosted our tests and supplied us with a box of Cooke Primes. I brought along a fantastic DP named Todd Williams, ironically we had just shot a short the week earlier using a mini35 Adapter on an XL1. Todd was excited for this test as he has taken the DVX100 as far as it could, as seen on Art History, and wanted to see how much farther this adapter would let him go.

The Adapter

The adapter is much like a sleigh for the camera. The camera goes on one side, and the Cine lens go in the other.
Camera Plate to attach the Camera.

    The Adapter is extremely well made. It is all industry quality machining and has no plastic parts, everything is made to tight tolerances as would be expected for the $6000 price tag.

The oscillating ground glass is speed variable and motor driven, and operated by the same battery type as the DVX.

    The oscillating ground glass is powered by Panasonic type batteries, and one battery should have no problem lasting you the entire day.

    Below are some images of the basic assembly, It comes with a manual but we rarely needed to reference it. Basically you just need to screw on the Lens attachment onto the DVX, and then snap it into the adapter assembly. The DVX needs to be at full zoom, this can still be adjusted after the assembly as there is a little cutout to spin the focus and zoom rings on the DVX. Once its assembled you focus on the ground glass when its turned off.

DVX100 receiver screwed on via the 72mm threads. There is a locking mechanism that needs to be aligned to your camera, but only once. We received a Panavision mount and a PL mount for our tests.

     There are a couple different Mounts for the adapter to take different lenses. We were sent a PL mount and a Panavision mount. You can use Anamorphics, Zooms and Primes, we choose to use a box of Cooke S4s. Cooke lenses have a very large diameter of glass so the light roll off on the edges is less noticeable since the DVX is capturing the center of the frame. They are also very sharp, fast (2.0f) and eliminate most flares.

Wire Sockets for input and remote. Cooke 100 mounted and ready to go.

That are nice retractable rods to support any follow focus or mattebox you could need. They should also fit Zoom supports if used.

At over 2' long and 15 pounds means no more one handers. ( I know you don't do that anyway's :)

We were able to match the focal distance on the Cookes so the focus scale measurements remained accurate. We chose the Cookes over the Zeiss as the Cookes are just simple better lenses, and the diameter is significantly larger than the Zeiss's so the edge light fall off is less noticeable.

In Use:

     After we assembled the unit, and focused on the ground glass the first thing we did was adjust the speed of the ground glass, till it wasn't noticeable We found that setting #4 gave us best results, with a focus reading on the DVX at 60 and a F stop on the DVX at 3.4f and the cookes wide open (2.0f). We noticed about 2 stops of loss using the adapter, and we complimented that by adding 4k's of light, about 2x the amount of light we normally would require.. To test contrast latitude, we left the scoop lights un-diffused.

     The Cooke's marked focal measurements remained accurate, and we were able to take consistent measurements throughout the range of lenses. When you first look at the Monitor you naturally feel like you are having a hard time to get the image to "pop" when you hit focus. Some of this is because of the Ground Glass effectively resembles shooting through a black pro mist filter.

Setup: 2 Arri 2k scoop soft lights back on low, front on high settings. Chair 10' from lens, Back wall 18' from lens. Camera Settings 24pA, Cine-gamma, Default.


100mm Cooke Wide Open (2.0f) 3.4f on DVX


75mm Cooke Wide Open (2.0f) 3.4f on DVX


50mm Cooke Wide Open (2.0f) 3.4f on DVX


40mm Cooke Wide Open (2.0f) 3.4f on DVX


32mm Cooke Wide Open (2.0f) 3.4f on DVX


25mm Cooke Wide Open (2.0f) 3.4f on DVX


18mm Cooke Wide Open (2.0f) 3.4f on DVX


14mm Cooke Wide Open (2.0f) 3.4f on DVX


The Rack between me and Trent from Clairmont with the 40mm Cooke; with me 10' and Trent 5' from the lens Click Here to View the Rack Windows Media 9 clip

     We were very impressed with the results. The footage took on the warm characteristics of the Cooke Primes and gave a very nice shallow depth of field. You need to use alot of light to compensate shooting through the 3.8f DVX at tele, 2 stop loss on the adapter and then whatever the true stop of the Cinema lenses you are using. Shooting at night may be tough, and given the increased size those shoulder mounted shots become a little less comfortable, but the Mini35 adapter's images are well worth those trade-offs.

Special thanks to P+S Technik, Barb at ZGC and Trent at Clairmont for providing us with the Mini35.

posted by 이코 2007. 7. 5. 03:40

P+S Technik Mini35 디지털 심상 변환기
Canon XL 사진기를 위해, Panasonic AG-DVX100/100A, 소니 HDR-FX1/HVR-Z1U, 소니 PD150/PD170

빨리 옴 !
JVC GY-HD100U - 2005년 유효한 늦은 August/early 9월 - 너의 명령을 지금 두십시요 !

압박떨어져 뜨거운 !
첫번째 검토를 보고 Charles Papert의옆에 www.hdvinfo.net에 JVC GY-HD100U 전 생산 모형의 탄과 Cooke S4 35mm 렌즈에 Mini35을, 간색하십시요

사용되는가 MINI35을 찾는가?
전 소유하는, Canon과 소니 팔라듐에 사용을 위해 300 의 일련번호 Mini35s 사진기. 접촉 Christine Brnic, ZGC: 973-335-4460, chris@zgc.com


Mini35 디지털 심상 변환기, 경량 지원막대 와 Cooke S4 35mm 주요한 필름 렌즈에 채비를 차려 주는 JVC GY-HD100U.
Mini35 디지털 심상 변환기, 경량 지원 막대 , 35mm Cooke S4 주요한 필름 렌즈에 채비를 차려 주는 Canon XL2.


Canon XL1S mounted to the P+S Technik Mini35 Digital Image Converter
Mini35 디지털 심상 변환기는 보인 Canon XL1/XL1S에 Canon XL1S.에 거치하 거치했다


Panasonic AG-DVX100 mounted to the P+S Technik Mini35 Digital Image Converter
Panasonic AG-DVX100/DVX100A Mini35 에 거치하.


Sony DSR-PD150 mounted to teh P+S Technik Mini35 Digital Image Converter
소니 DSR-PD150은 Mini35에 거치했다.


(A 진짜 아름다움 behold에 그러나 그리지 않는, 유감스러운 !)
Mini35 디지털 심상 변환기를 위해
소니 HDR-FX1 / HVR-Z1U 사진기
저장안에


특징
임대료
가격
누구가 Mini35을 사용했는가?
사용잘아고 에와 끝
소형 35 디지털 접합기 설명서 (PDF 체재)
DVXuser.com의옆의 Mini35및 Panasonic AG-DVX100의 독립적인 검토와 시험 탄

시험 피트수

텔레비젼 반점 , 기록영화의, 음악 영상및 더를 보이는 시험 피트수는 유효하 다. 우편물의옆에 DVD을 받기 위하여 우리들을 접촉하십시요 .


특징

  • 35mm 필름 사진기에것과 같이 전망의 분야, 초점및 각의 사실상적으로 동일 깊이.
  • 35mm 필름 렌즈 를 위해 낙관하는 -- 동의와 아직도.
  • Mini35 릴레이 는 표준 사진기 체제에 유효한 새로운 창조적인 자유를 주는 분 야의 깊이를 영향을 미치기없이 체계에 불빛의 총계의 통제에 그것의 고유의 홍채를 비치하고 있다.
  • 400의 일련번호 Mini35은 뒤에 오는 특징을통합한다: 지상 유리는 회전시키기의 대신에적으로 oscillates; 더 조용한 가동; 사 진기와 Mini35의 동시 start/stop 단위; 유지하게 쉬운 .
  • Arri 통제선 , Nikon, Panavision, Leica, Zeiss contax또는 Canon EF 35mm 렌즈에 쏘기를 위해 유효한 교환할 수 있는 산 .
  • 공업 기준 15mm 경량 지원 막대는 대중적인 matte 상자를 수용하고, 초점 단위와그밖 직업상 영화 부속품 을 따른다.
  • 소니, Canon및 Panasonic camcorders사이 쉽게 개조하 동일 400 일련번호 Mini35 기본적인 단위에 적당한 사진기 접합기를 사용한 .
  • 지금 개량된 광학에 격상시키는 소니사진기 접합기가 이다것과 같이, Canon XL1/Xl1S 사진기 접합기는 Mini35 단위의 모든 버전에 양립하다.
  • 너가 아주 최선 심상 질을 달성하는 것을 지키기 위하여는 , Panasonic 사진기 접합기는 400 일련번호 Mini35 단위에 양 립하다 다만.

사용
  • 필름 대원: 전 생산 예심 피트수를 쏘고 비싼 필름 사진기를 사용하 기없이 여실한 35mm 심상을 얻으십시요.
  • Filmmakers: 겸손한 예산에 너의 창조적인 시각을 생성해거든 MiniDV을 사용한 사실상적으로 동일물에 끝 나곤 제품을 위해 비싼 필름 저장의 35mm 필름 렌즈는 대신에적 으로 보고 느낀다.
  • 분야에서 질 예심 피트숲 일름 같이 Email.
  • 필름은 훈련한다: 필름 을 위해 중대한 분야 통제의 짜맞추고, 점화하고그리고 깊이 35mm을 가르치기 훈련한다.
  • 필름 학생: 너 의 현지 필름 장비 임대료 시설에서 P+S 소형 디지털 접합기와 35mm 필름 렌즈를 세놓고 비싼 필름 저장을 사용하기없이 실제 적인 필름 생산 경험을 얻으십시요.
  • 초점 당긴 실행하고, 분야의 깊이에 창조적 쏘고그리고 얻으십시요 -- 싼 소형 DV 테이프에 모두.
  • 직업상 Videographers: 영상에 35mm 필름의3차원 질을 재생하고 텔레 비젼 반점, 인터넷 신청및 발표를 위해 더 낫은 심상을 생성하 십시요. 사진기 통신수 세계전반의에서 보고: " 클라이언트는 away 불었다. 그들은 필름에 ! " 쏘지 않았다 것 을 믿을 수 없었다
그것이 일한다 까 라고


접합 기는 너가 그것에 붙이는 35mm 렌즈의 필름 비행기안에 위치하 는 지상 유리에 35mm 심상을 창조한다. 접합기안쪽에 육체 심 상을, 35mm 필름 체재안에 현재 분야의 깊이에 자연 통제는 창 조하기에 의하여, 너의 소형 DV 테이프에 보호된다. 이 여실한 35mm 체재 심상은 camcorder's CCDs의 위에 그때 중계된다 .

접합기 릴레이는 분야의 깊이를 영향을 미치 기없이 체계에 불빛의 총계를 통제하는 그것의 고유의 홍채를 비치하고 있다.분야의 깊이를 정의함것은 필름 렌즈의 가늠구멍 을 놓기에 의하여 보통적으로 달성된다. 체계에 통제에 접합기 에 홍채를 독립적으로 불빛의 총계 조정하십시요. 소형 35 디 지털 접합기의 이 특징은 너에게 표준 사진기 체제에 유효한 새 로운 창조적인 자유를 준다.

추가안에, 렌즈 의 전망의 각은 보호된다. 보기를 위해, 이 체계에 사용될 때 25mm 필름 렌즈 유물 넓은 각.

ZGC 기술 책상에서 끝: 접합기에 심상이 가 혹한 영상 세부사항을 연화하는 그러니 낮은 대조 여과기의 사 용이 필요하지 않다 것을 가장 큰 사람은 발견한다 . 덜아고 에 와 소형 35 디지털 접합기에 관한 ZGC 기술 책상에서 끝을 위해 여기서 누르십시요 .

사람이 이 특별한 장치에 관한 말하고 있다 무엇이라고 읽는것을 " DV Production/P+S Technik 디지털 심상 변환기의 공구 부 르는에 DVInfo.net 지역 사회 Chatroom 단면도, " 간다. chatroom의 이 특별한 단면도는 ZGC. Call의 Guy Genin에 의하 여 지금 우리들 알맞도록 한다,또는 장치에 관한 너의 기술 질 문을 지역 사회에 다른사람에 나누고 전문가에서 응답을 얻으십 시요.

" 우리에 의하여 북아메리카저 쪽에의에서 납품업자에 다루는 그을린 얼음 디지털 지점및 그을린 얼음 그 림에 우리가 ZGC에서 받은 봉사, 기술지견및 지원은 아무도에 둘째로 이고. 적시 방법안에 자세를 취하는 질문및 관심을 응 답하게 그것은 sales/support 팀 능력 있는과 같은 긍정 적이고 , 도움이 되는 태도에 다루기 위하여 상쾌하게 하고 있다 . " -- Craig Van Horne


?Prices
묘사
가격 US$
P+S Technik 소 형 35 디지털 심상 변환기
일련번호 400 단위
포함한다: 일련번호 400 버전 소형 35의디 지털 단위, 두개의 15mm 막대, 견부와 사진기 지원, 측및 정상 손잡이? 주:? 요구되는 사진기 접합기와 산; 아래에 보십시 요.

$ 7,455

선택 산
Arri 통제선 산

$ 250

Nikon 산

$ 375

Panavision 산

$ 475

Leica 산

$ 375

Zeiss Contax 산

$ 375

Canon EF 산

$ 375

사진기 접합기
JVC GY-HD100U 사진기 접합기
(요구되는) 사진기에 단위를 붙인 다.

$ 2,500

Canon XL1/XL1S/XL2 사진기 접합기
(요구되는) 사진기에 단위를 붙인다.
군기 접안경 부류를 포함한다 (단위의 위에 Canon 군 기 Viewfinder아래 이동하고기 잠그기를 위해)
주: 단색지도 접안경 부류 (단위의 위에 Canon Black/White Viewfinder아래 이동하고기 잠그기를 위해)

(Mini35 단위의 모든 이 전 버전에 양립한.)

$ 2,500

소니 HDR-FX1과 HVR-Z1U HDV 사진기 접합기
(요구되는) 사 진기에 단위를 붙인다.

$ 2,500

Panasonic AG-DVX100E/DVX100A 사진기 접합기
(요구되는) 사진기에 단위를 붙인 다.
(최선 심상 질을 지킨 위하여, Panasonic 사진기 접합기는 400의 일련번호 Mini35, 이전 버전에 양립하다 다만.)

$ 2,500

소니 HDR-FX1/HVR-Z1U에 Panasonic AG-DVX100E/DVX100A
장비 다만의 (부품)을 소니 사진기에 Panasonic Mini35 사진기 연결 장비를 적응하 위하여 적응. 포 함한다: 격판덮개, 고리및 건전지 홀더.

$ 750

소니 DSR-PD150/PD170 사진기 접합기
(요구되는) 사진기에 단위를 붙인다.
(Mini35 단위의 모든 이전 버전에 양립한.)

$ 2,500

잡다한
Canon XL2 플래트홈
Mini35의 위에 사진기의 적당한 적합을 위해필요한 .

XL2 사진기를 수용한것을 너의 현존하는 XL1/XL1S 연결 장비를 격상시킨 만약에 ****은다만 필요로 했다 .

$ 120

두 15mm 막대 (보충으로서 )

$ 150


출처: http://www.zgc.com